Getting Started with Kubernetes


Kubernetes Architecture
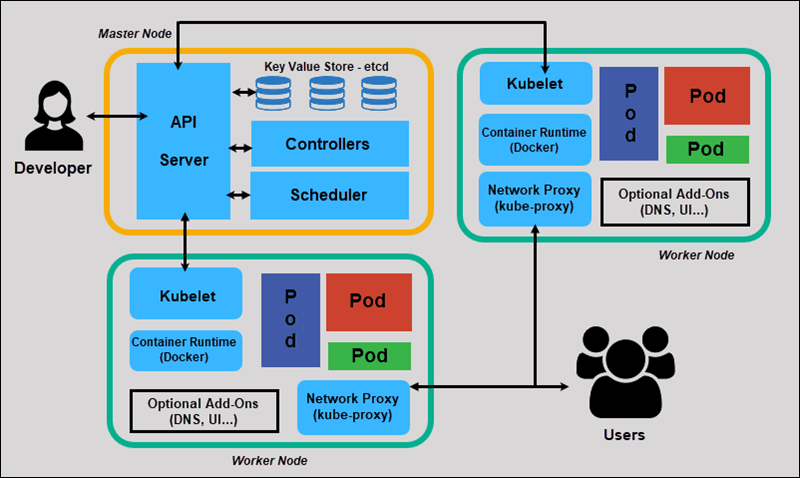
Schematic representation of a K8s architecture and its core components
Along these notes, both "Kubernetes" and "K8s" might be used, they mean the same thing.
Cluster

Simple representation of a K8s cluster
A K8s architecture is made of a cluster in which a central component, the master, manages other components: nodes.
Master
A K8s architecture revolves around a central component which we call the master. It is a compound of multiple smaller components but only exposes one of these sub-components: the API Server.
The master is responsible of cluster management.
Nodes
Each "server" - the type or server does not matter here: it could be a VM, a bare metal instance, etc. This will not change anything - in the cluster is registered as a "node" of the cluster.
Each node of the cluster listens for instructions from the master and sends data about its current state so that the master handles and splits the workload better between all the nodes in the cluster.
To register a "server" as a node, we must install Kubelet on it for it to listen to the API Server and report its state via it.
API Server
The Master exposes a RESTful API (via HTTPS, port 443) to communicate with the other parts of the architecture.
Using the REST API exposed by the API Server should be the only way you interact with your K8s architecture once everything is set up properly: with K8s you do not need to know which node runs which pods: the deployment file you provide to K8s via the API Server is enough for the system to ensure it matches the description of your needs.
We will often refer to the API Server as the master directly, but this is not actually true, just keep in mind this is only language abuse as it is way more understandable to use "master" to designate the API Server.
Pods
Nodes in the cluster does not directly run containers but instead they run pods.
A pod consists of one or multiple containers running together and all sharing the same IP address, which is assigned to them by the node thanks to the kube-proxy program.
Since we cannot know which node will run which pod and how many pods will be deployed exactly nor their IP address, there exists another solution to expose an IP address that will then send requests to the pods as needed, no matter where they are running on the cluster: the service.
Service
One or multiple pods can be spawned depending on the load of your application but they won't have a fixed IP address. Let's say you have a frontend app that communicates with a backend app. The frontend app is containerized and runs into pods on the cluster. The same goes for the backend app. How do we make the apps accessible to one another as they will have possibly multiple different IP addresses at the same time?
To do so, we use services which kind of acts as a proxy: a service provides a single IP address and a domain name so that it is easily reachable, this service is tagged with one or multiple tags and will look on the cluster for all pods that share the same set of tags: as soon as a pod has all the tags the service has, the service will register them and start forwarding the requests it receives to that pod. This process is continuous which mean that when a pod disappears, the service is notified about it and no request is lost, and when a new pod spawns, the service detects it too and immediately starts forwarding requests.
Services are an essential component for building scalable applications that require multiple components to interact.
Installing Kubernetes
There is no need for a lot of writing here, the official documentation is really well written and explains it really well.
If you want to install Kubernetes on your local machine to try out a few things this might help you.
If you have a cluster running OpenShift, each kubectl command on this document can be replaced by the same command only you have to replace kubectl with oc
Working with pods
When talking about virtualization, traditionally the first thing that comes to mind is the VM as the atomic unit of scheduling. Containerization brought containers as this unit and K8s brings the pod as the atomic unit of scheduling.
If a pod is composed of multiple containers and one of them does not start correctly, then the pod does not start at all: there is no such thing as an "incomplete pod". Moreover a pod is only "detectable" when it has fully started, not before.
The pods are declared in a manifest file which can be written either in YAML or in JSON.
Pod manifest example
To declare a pod, one way is to declare it via a manifest which is a file describing its name and the container(s) it is made of. A manifest is written in YAML or JSON in a dedicated file.
Here is an example of what such a manifest can look like:
# file name: my-pod.yml
apiVersion: v1  # Version of the API to use
kind: Pod  # Type of manifest
metadata:  # Additional data to identify the pod
    name: my-pod  # Name of the pod
    labels:  # Optional, will be useful later
        version: v1  # Version of our pod
spec:
    containers:  # Containers composing the pod
        - image: amiralblndic/express-demo  # Docker image to use
            name: express-demo  # Name to give to the container
            ports:
                - containerPort: 8080
Put the code above in a file with a name like my-pod.yml and execute the following command to register the pod into your cluster:
kubectl create -f my-pod.yml
Let's break down this command:
kubectl: indicates that we are interacting with the API Server on the clustercreate -f: indicates that we want to create something from a manifest filemy-pod.yml: indicates the manifest file to use
The API Server then reads the manifest file we sent it and creates a pod matching the requirements as described in the manifest. After a little time you should see the pod running.
Reminder that to check the pods on your cluster you only have to run this simple command: kubectl get pods and you will be presented with a list of pods and their state.
If your pod is not running or is in a failing state, you can always get more information with the kubectl describe pod <pod-name>, which in our case translates to kubectl describe pod my-pod.
Deploying multiple instances of a pod with a ReplicationController
There happens that you want multiple instances of a pod to run at the same time in your cluster.
In that case, rather than working directly with pods - which is in fact practically never the right way to work with Kubernetes - you can use a ReplicationController which will create as many pods as you specified it and also ensure that there will always be this number of pods running: if one goes down, another one will be up to replace it very quickly.
This is what a manifest for a ReplicationController looks like
# file name: rc.yml
apiVersion: v1
kind: ReplicationController
metadata:
    name: my-pod-rc  # Name of the ReplicationController
spec:
    replicas: 5  # We want 5 instances of our pod running at any time
    selector:  # Define the labels and values of the pods that the ReplicationController will control
        app: express-demo
    template:  # The pod template, just like a pod manifest
        metadata:
            labels:
                app: express-demo  # Make sure the template matches the selector from the ReplicationController
        spec:
            containers:
                - image: amiralblndic/express-demo
                    name: express-demo-ctr
                    ports:
                        - containerPort: 8080
To deploy the ReplicationController to your cluster use the following command:
kubectl create -f rc.yml
No need to break the command down here, it is exactly the same as the one for deploying the pod: only the manifest (hence the file name) changes.
What is really interesting about this is not only it allows to spin up multiple pods very quickly and efficiently but also that if you modify the manifest file (maybe your app was updated or you want more replicas of the pod to run), and run the following command, then the ReplicationController will be updated: its configuration has changed but Kubernetes detects that it is in fact the same ReplicationController and is able to update its configuration on the fly to match the new desired configuration.
kubectl apply -f rc.yml
As you can see, the only thing that changes is that rather than creating a new ReplicationController, we use the apply subcommand to make Kubernetes update an existing ReplicationController. If the desired object does not exist on the cluster, Kubernetes will create it.
Kubernetes Services
The theory
For a quick description, or as a reminder, you can check out the description of a k8s service from before.
A service is a REST object just like pods and ReplicationControllers.
To attach pods to a service, we use labels, just like we did with the ReplicationController.
Creating a service with kubectl
Creating a service can be done from the command line.
As an example, let's try to access any of the pods we deployed via the ReplicationController in the previous section. Spoiler alert: you will not be able to.
To do so, you must expose the ReplicationController so that it is accessible from outside the cluster. In our case, this can be done with the following command:
kubectl expose rc my-pod-rc --name=my-pod-svc --target-port=8080 --type=NodePort
This should create a service and make your pods accessible from outside the cluster: to do so check the description of the service:
kubectl describe svc my-pod-svc
Check the value of the NodePort value in the output of this command. For example, if you see NodePort: <unset> 12345/TCP, you should be able to access your app at the IP of your cluster on port 12345.
If you are running minikube you can easily get the IP of the cluster with the minikube ip command.
Creating a service with a manifest
This is the recommended way of creating a service.
Just like the previous objects were defined with manifests, we can write a manifest for a service. Here is an example:
# file name: svc.yml
apiVersion: v1
kind: Service
metadata:
    name: express-demo-svc  # Name to give to the service
    labels:  # Labels to apply to the service
        app: express-demo
spec:
    type: NodePort  # NodePort makes the service accessible from outside the cluster
    ports:
        - port: 8080  # Pod/Container port to map to (the app exposes port 8080)
            nodePort: 30001  # Port the service will be publicly accessible from
    selector:  # Set of labels the Pods that the service will expose should have
        app: express-demo
Now you have to run this simple command that you should start to know pretty well and the service will be deployed to your cluster.
kubectl create -f svc.yml
With the service running on your cluster, get the IP of your cluster and you should be able to access the express-demo app at URL http://<cluster-ip>:30001.
Sources
Production-Grade Container Orchestration
Getting Started with Kubernetes